| A | B | C | D | E | |
|---|---|---|---|---|---|
1 | |||||
2 | |||||
3 |  | ||||
4 | The Off2Class Step-by-Step Curriculum Spreadsheet | ||||
5 | |||||
6 | |||||
7 |  | INTRODUCTION | |||
8 | |||||
9 | Welcome to Off2Class, the software toolkit that equips ESL teachers with high-interest interactive lesson slides to guide their students online or in the classroom. | ||||
10 | |||||
11 | Heavily popular on Off2Class is the 6-level Step-by-Step Curriculum consisting of 66 units of consecutive integrated skills lessons that incorporate reading, listening, speaking, and writing along with grammar instruction. | ||||
12 | |||||
13 | We have now constructed this spreadsheet to make the contents of the Step-by-Step curriculum easily accessible to tailor to your needs. | ||||
14 | |||||
15 | This Step-by-Step Curriculum Spreadsheet provides a comprehensive summary of grammar and topics taught in the Off2Class Step-by-step Curriculum lessons. It also offers user-friendly navigation of the content. | ||||
16 | |||||
17 | Objectives and Can-do Statements are listed for each lesson. Objectives help teachers define learning outcomes for a lesson. Can-do Statements are intended for students to track and assess what they ‘can do’ with target language at the end of a given lesson. | ||||
18 | |||||
19 | The final column on the spreadsheet houses the various structures embedded in each lesson. This enables users to easily search structures across the 6 levels, 66 units, 252 lessons. | ||||
20 | |||||
21 | | HOW TO USE THE SPREADSHEET | |||
22 | |||||
23 | To access the Step-by-Step Curriculum data, click on Curriculum Lessons tab at the bottom of the spreadsheet. You can then toggle between the Curriculum Lessons tab and How to use this sheet tab as needed. | ||||
24 | |||||
25 |  | ||||
26 | |||||
27 | The spreadsheet clearly outlines the entirety of the Step-by-Step Curriculum, with searchable filters for CEFR level (A1 to C1), Unit number (1-66), Lesson number and name (1-252). | ||||
28 | |||||
29 | The ability to perform searches for words and phrases in the Objectives, Can-do Statements, and Structures, as explained on the top rows of the spreadsheet, gives users new versatility to explore the content of the Step-by-Step Curriculum. For example, a search for the present simple would highlight in green each instance of present simple in the entire curriculum. A user could scroll and see at a glance the span of the coverage of the present simple in individual lessons, units, and levels. See Tips below for how to use the spreadsheet in your classes. | ||||
30 | |||||
31 | 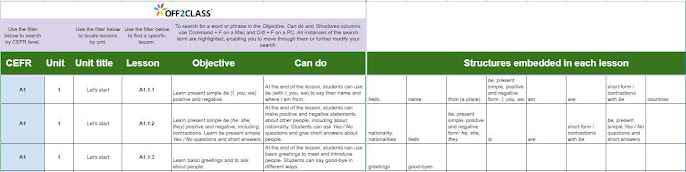 | ||||
32 | |||||
33 |  | Institution administrators: Scroll the entirety of the spreadsheet to familiarize yourself with the scope of the content. Search the spreadsheet for specific structures to verify which lessons or units match your syllabus needs. Refer to Objectives and Can-do Statements for context for the language taught. | |||
34 | |||||
35 | | Teachers: Before teaching a unit, scan all unit content to see how presentation of a particular grammar topic is divided. For example, for the present simple, see which lesson in a unit focuses on positive and negative, which lesson covers Yes / No questions and which one covers Wh- questions. This quick preview will inform your teaching. It may also reveal that some lessons may not require full attention or could potentially be skipped to cater to the needs of your students. | |||
36 | |||||
37 | | Teachers: Use Objectives to define learning outcomes for your students and gauge their progress. Clear objectives let students know that there is a reason for the exercises and activities that come in a lesson. As students work through each lesson of a unit and complete homework, use the Can-do Statements to track ability, before culminating in assessment, such as the Progress Test. Understandably pause and review as needed if any student isn’t achieving lesson goals. | |||
38 | |||||
39 | | Teachers: You will notice that the Objective statements in the spreadsheet begin with Learn, Review, Practice, or Expand understanding. These words hint at students’ predicted knowledge of a grammar point at the given level and will guide you to effectively move toward specific goals. For example, the objective for Lesson 64 states Review conditional forms; however if you see that your student is struggling, it may be necessary to turn to an earlier level that covers the topic in more detail. | |||
40 | |||||
41 | At the end of the lesson, return to the Can-do Statements and have the student(s) confirm that they have achieved the goal. If they have not, determine what they still need to review. | ||||
42 | |||||
43 | | Teachers: You may choose to offer your students Can-do Statements as a self-assessment tool. At the start of every unit, email your students the list of Can-do Statements for each lesson in the unit. They can check off the items they can do as they progress through a unit. Such consistent active measuring of one’s progress can empower a student and inspire accountability for learning. | |||
44 | |||||
45 | | Teachers: When you incorporate Objectives and Can-do Statements into a lesson, encourage discussion and give feedback--before, after, and during a lesson. Help students identify what they already know, skip topics if review is deemed unnecessary, and slow down and supplement if any students are struggling. | |||
46 | |||||
47 | | Teachers: Search and find the spreadsheet for the word write to pull up the variety of writing topics presented in the curriculum. Lesson 4 of a unit is typically the writing lesson. Refer to the Objective and Can-do Statements for more details about the writing task. Some writing lessons may be suitable out of order, for example, if a student needs help with essay structure or writing a job application letter. | |||
48 | |||||
49 | | Teachers: Search the spreadsheet for the phrase linking word. This will pull up a range of linking words that are taught across units and levels. These lessons or individual slides can provide a valuable supplement to speaking and writing activities. | |||
50 | |||||
51 | 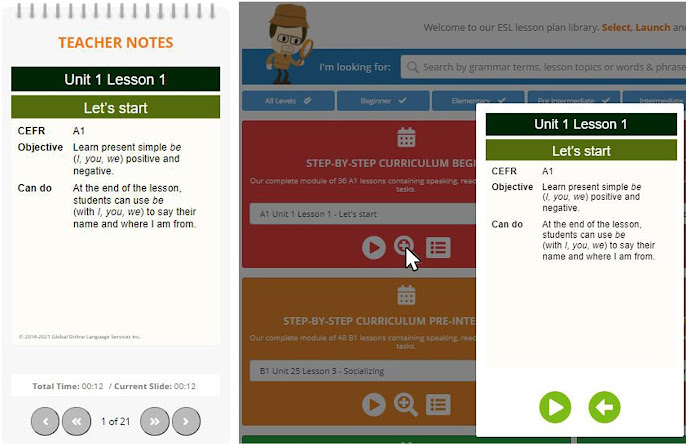 | ||||
52 | |||||
53 |